You are hereMission
Mission
Mission
In this Section it is described 3D Post-Processing of Mission Analysis.
The Section is divided in:
1. Graphic Control of the Output of Mission Analysis through 15 Buttons
2. A Graphic Area to visualize Output
3. The choice of Outputs through 3 Buttons and two Combo Box
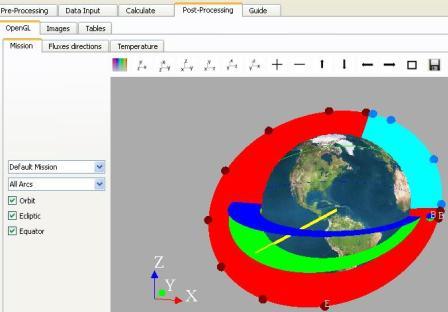
Figure 1
GRAPHIC CONTROL
The Buttons (from left to right) serve to:
1. To change color of the background of Graphic Area
2. Rotation of the Output so as to have the X Axis leftward, the Y Axis upward, the Z Axis outward
3. Rotation of the Output so as to have the Y Axis leftward, the X Axis upward, the Z Axis inward
4. Rotation of the Output so as to have the Y Axis leftward, the Z Axis upward, the X Axis outward
5. Rotation of the Output so as to have the Z Axis leftward, the Y Axis upward, the X Axis inward
6. Rotation of the Output so as to have the Z Axis leftward, the X Axis upward, the Y Axis outward
7. Rotation of the Output so as to have the X Axis leftward, the Z Axis upward, the Y Axis inward
8. Zoom of Output
9. Un-zoom of Output
10. Translation of Output upward
11. Translation of Output downward
12. Translation of Output leftward
13. Translation of Output rightward
14. Restoration of initial values of translation and zoom
15. To save the Image restrained in the Graphic Area
GRAPHIC AREA
The Graphic Area shows the Earth in the case in which Mission Analysis made are not available.
Otherwise, it shows the Planet relative to the Orbital Arc selected in the Second Combo Box from high.
In the case in which in this Combo Box is selected the “All Arcs” Option, it is shown the Planet corresponding to the First Orbital Arc.
The Tern
points the X Axis in the direction of the straight line joining the
Planet and the Sun at the Spring Equinox of the Planet ( Point
for the Earth).
Point
for the Earth).
The Y Axis lies over the orbital plane of the Planet.
They are shown:
1. In Blue the Equatorial Plane of the Planet.
2. In Green the Orbital Plane of the Planet
3. In Red the part of the Orbital Arcs in light
4. In Azure the part of the Orbital Arcs in shadow
5. In dark Azure the Orbital Positions in shadow chosen in the Orbit Section
6. In dark red the Orbital Positions in light chosen in the Orbit Section
7. With B and E letters, the initial an final Orbital Positions
CHOICE OF OUTPUTS
The First Combo Box from high allows to choose between the Mission Analysis made, the one for which to display Outputs.
The Second Combo Box from high allows to choose between more Orbital Arcs which display or to visualize all together.
The Orbit Check Box activates the visualization of Orbital Arcs selected.
The Ecliptic Check Box activates the visualization of the Orbital Pane of the Planet.
The Equator Check Box activates the visualization of the Equatorial Plane of The Planet.